Start working on scene usd/en — различия между версиями
Maxonline (обсуждение | вклад) |
|||
| (не показаны 74 промежуточные версии 5 участников) | |||
| Строка 1: | Строка 1: | ||
<languages/> | <languages/> | ||
| − | So, you need to start working on an | + | So, you need to start working on an animation scene. The process of opening the scene is a little different from what you might have seen on other projects. <br> |
We use Pixar's [[USD]] format to store anim_prep (scene layout prepared for animators), so you won't be able to open the scene as usual. <br> | We use Pixar's [[USD]] format to store anim_prep (scene layout prepared for animators), so you won't be able to open the scene as usual. <br> | ||
| − | Also a link to anim_prep | + | Also a link to anim_prep scene is ''live'', so when layout team add new assets to the anim_prep scene, they will also appear in your animation scene. <br> |
| − | To do this, we use a plugin from Animal Logic, [[AL_USDmaya]], with our modifications | + | To do this, we use a plugin from Animal Logic, [[AL_USDmaya]], with our inhouse modifications. |
| − | == How to | + | == How to build scene? == |
<big>'''You only need to follow this procedure the first time you open a scene, after building and saving, you will be able to open the scene as usual.'''</big><br> | <big>'''You only need to follow this procedure the first time you open a scene, after building and saving, you will be able to open the scene as usual.'''</big><br> | ||
| − | '''1.''' '''Always''' start | + | '''1.''' '''Always''' start building a new scene with '''empty scene''', then select '''Wizart Animation => USD => Start From Anim Prep''' from the menu. |
{| | {| | ||
|- | |- | ||
|[[File:start_from_anim_prep_menu.png|400px|обрамить|слева]] | |[[File:start_from_anim_prep_menu.png|400px|обрамить|слева]] | ||
|} | |} | ||
| − | |||
'''2.''' A dialog box will appear where you need to select the name of the Episode and the name of the Scene you want to start working on. | '''2.''' A dialog box will appear where you need to select the name of the Episode and the name of the Scene you want to start working on. | ||
{| | {| | ||
| Строка 20: | Строка 19: | ||
|[[File:start_from_anim_prep_diag.png|400px|обрамить|слева]] | |[[File:start_from_anim_prep_diag.png|400px|обрамить|слева]] | ||
|} | |} | ||
| − | |||
'''3.''' Then click '''Import'''. <br> | '''3.''' Then click '''Import'''. <br> | ||
| − | <big> After a successful '''Import''', you can save the scene to your working folder, and then open and save the scene as usual. </big> | + | <big> After a successful '''Import''', you can save the scene to your working folder, and then you can open and save the scene as usual. </big> |
As a result of Import operation will be created: | As a result of Import operation will be created: | ||
* A Proxy Shape object [[AL_USDmaya]] will be created with a link to the latest version of the [[USD]] scene via [[Wref Resolver| wref]]. | * A Proxy Shape object [[AL_USDmaya]] will be created with a link to the latest version of the [[USD]] scene via [[Wref Resolver| wref]]. | ||
| − | * The | + | * The Frame Range from the [[USD]] scene. |
* A link to the latest version of the sound will be created as a may reference via [[Wref Resolver| wref]]. | * A link to the latest version of the sound will be created as a may reference via [[Wref Resolver| wref]]. | ||
| − | * Will automatically be put down in the scene pin on the Wref Context of all Maya's rigs. This means that you will need to switch the | + | * Will automatically be put down in the scene pin on the Wref Context of all Maya's rigs. This means that you will need to switch the rig versions explicitly through The Wref Context Manager, <br> if needed. All other files referenced in scene we don't pin, so latest available versions will be loaded. |
| − | |||
{{warning| Warning| In any case, do not manually correct the path to the files, it can break the entire pipeline. If you have a problem with the scene, please email support.}}<br> | {{warning| Warning| In any case, do not manually correct the path to the files, it can break the entire pipeline. If you have a problem with the scene, please email support.}}<br> | ||
| + | |||
== Working with the USD scene == | == Working with the USD scene == | ||
| − | The entire scene is loaded as a USD Proxy, and a minimum number of | + | The entire scene is loaded as a USD Proxy, and a minimum number of maya nodes are created. <br> |
<big>Characters have no rig loaded at the start, but they should be displayed in the starting position.</big> <br> | <big>Characters have no rig loaded at the start, but they should be displayed in the starting position.</big> <br> | ||
To see the real hierarchy of the scene, you need to open USD Outliner. | To see the real hierarchy of the scene, you need to open USD Outliner. | ||
| Строка 43: | Строка 41: | ||
|[[File:al_usd_outliner_menu.png|400px|обрамить|слева]] | |[[File:al_usd_outliner_menu.png|400px|обрамить|слева]] | ||
|} | |} | ||
| − | + | The created panel can be docked to Maya's UI. | |
| − | The created panel can be | ||
{| | {| | ||
|- | |- | ||
|[[File:maya_dock_usd_outliner.gif|обрамить|слева]] | |[[File:maya_dock_usd_outliner.gif|обрамить|слева]] | ||
|} | |} | ||
| − | |||
In the beginning, you need to decide on which characters or items you need to load rig. <br> | In the beginning, you need to decide on which characters or items you need to load rig. <br> | ||
| − | It may not be all | + | It may not be all assets, for example, the assetin this scene is static, or the supervisor animator has given you the task to animate only certain assets.<br> |
| − | To switch the asset from cache to rig, select the | + | To switch the asset from cache to rig, select the asset in USD Outliner, and right-click in the context menu '''Variants=>animDisplayVariant=>rig'''. <br> |
| − | This will download the maya reference onto the | + | This will download the maya reference onto the asset, and it will have to move to the same location as it was set in the USD scene. |
{| | {| | ||
|- | |- | ||
|[[File:usd_outliner_switch_rig_variant.gif|обрамить|слева]] | |[[File:usd_outliner_switch_rig_variant.gif|обрамить|слева]] | ||
|} | |} | ||
| + | {{warning| Warning | Asset references are now managed by the [[AL_USDmaya]] plugin, and the Department that prepares anim_prep. If your scene is missing an asset, contact support.}} | ||
| + | {{warning| Warning| Since this plugin controls the creation and on/off of references, in no case can you use the '''Reference Editor''' and edit references manually. This can lead to crashes.}}<br> | ||
| + | |||
| + | |||
| + | |||
| + | {| class="graytable" border="0" style="width:100%;" | ||
| + | |- | ||
| + | | style="width:50%;vertical-align:top;" | | ||
| + | === Activate & Deactivate === | ||
| + | <br> | ||
| + | |||
| + | When creating animations, manipulations are made with just a few objects. Most of the scene may be idle at this stage. Processing all scene objects may slow performance.<br> | ||
| + | |||
| + | To solve this problem, [[USD|'''USD''']] <abbr title='A Prim is the primary container object in USD: prims can contain (and order) other prims, creating a "namespace hierarchy" on a Stage, and prims can also contain (and order) properties that hold meaningful data'>'''prims'''</abbr> have an attribute '''Active'''. '''Prims''' are active by default, which means they and their active children will be composed and visited by stage traversals. By making a prim inactive, we prevent the '''prim''' itself from being visited by default traversals, and we also prevent the prim's descendant prims from even being composed on the stage.<br> | ||
| + | |||
| + | '''USD Outliner''' has two commands for working with the Active attribute: '''Activate''' and '''Deactivate'''.<br> | ||
| + | |||
| + | The '''Deactivate''' command changes the value of the '''Active''' attribute, making the '''prim''' inactive. Thus, the '''prim''', as well as their children that may be contained in it, will be filtered out during processing.<br> | ||
| − | + | The name of the inactive '''prim''' will be <s>strike out</s>. All children of this '''prim''' will also be inactive and will be excluded from the list.<br> | |
| − | |||
| + | The '''Activate''' command makes '''prim''' and his children active again, if necessary.<br> | ||
| + | |[[Файл:ActivateDeactivate.gif|centre]] | ||
| + | |} | ||
== Working with Wref Context Manager == | == Working with Wref Context Manager == | ||
| − | All paths in the scene, including [[USD]] Layers, Maya references, texture paths have a [[Wref Resolver| wref]] | + | All paths in the scene, including [[USD]] Layers, Maya references, texture paths have a [[Wref Resolver| wref]] format.<br> |
| − | However, | + | Such paths usually doesn't include reference to a specific version of the asset and normally you do not need to change this in the process. |
| − | * For example, when you start working on a scene, you want to | + | However, animator's work may require to define version explicitly: |
| − | * You have found some technical | + | * For example, when you start working on a scene, you want to pin the rig versions for a current scene, so that you can take a newer version while working on another scene. |
| − | + | * You have found some technical issue in the rig, and want to update version of the rig to a newer one in the scene explicitly and locally not breaking anything else. | |
| − | |||
| − | |||
{| | {| | ||
|- | |- | ||
| − | |[[File:wref_context_manager_menu.png|800px| | + | | style="width:50%;" | |
| − | + | For this purpose we store a special [[Wref Resolver|wref]] context in the Maya scene applied both in Maya and in USD. This [[Wref Resolver|wref]] context update the wref path to a physical path on disk.<br> | |
| + | To change versions and pin them easily there is a special UI, '''Wizart Animation => USD => Wref Context Manager'''. | ||
| + | In the appearing window you can pin on certain [[Wref Resolver|wref]] paths to pin the current versions. Also there you can switch to the desired version and pin it, remove pin, or update to the latest. | ||
| + | | style="vertical-align:top;"|<br> | ||
| + | [[File:wref_context_manager_menu.png|800px]] | ||
| + | |- | ||
| + | | | ||
| + | === Pin === | ||
| + | * The '''Version''' column displays the current version of the file used in the scene. | ||
| + | * If this version is pinned, the icon in the '''Pin''' column is set to: [[File:wref_cm_pin.png]] | ||
| + | * If the path has no pinned version, the icon in the '''Pin''' column is set to: [[File:wref_cm_unpin.png]] | ||
| − | + | | style="vertical-align:top;"|<br> | |
| − | * | + | [[File:Wref_context_manager_window.PNG|800px]] |
| − | * | + | |- |
| − | + | |colspan="2" style="vertical-align:top;"| | |
| − | + | {{warning| Warning| If a specific version is specified in the [[Wref Resolver|wref]] path and a pin is assigned, the pin value will take precedence.}} | |
| + | |- | ||
| + | | | ||
| + | * You can pin the '''version''' by entering the desired value in the Version column.<br> | ||
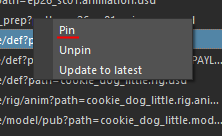
| + | * The second way to replace the version is to select one or more rows, click the right mouse button to cause the context menu and select '''Pin'''.<br> | ||
| + | |style="vertical-align:top;"|<br> | ||
| + | [[File:wref_cm_context_menu_pin.png]] | ||
| + | |- | ||
| + | | | ||
| + | === Update to the latest version / Unpin === | ||
| + | :To update the version to the latest, unpin the current '''version''': | ||
| + | * select one or more lines, | ||
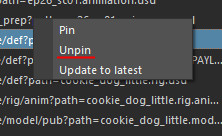
| + | * right-click to open the context menu and select '''Unpin'''. | ||
| + | |style="vertical-align:top;"|[[File:wref_cm_context_menu_unpin.png]] | ||
| + | |- | ||
| + | |colspan="2" style="vertical-align:top;"| | ||
| + | {{warning| Warning| If no version is specified in the [[Wref Resolver|wref]] path and no '''pin''' is assigned, the file version will be updated automatically to the latest.}} | ||
| + | |- | ||
| + | | | ||
| + | === Update to lates and Pin === | ||
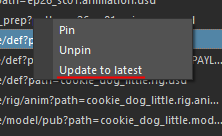
| + | :You can pin the latest at the moment version using the context menu item '''Update to latest''' ('''pin''' is set automatically). | ||
| + | | style="vertical-align:top;"|[[File:wref_cm_context_menu_update.png]] | ||
| + | |- | ||
| + | | | ||
| + | === Data Output Settings === | ||
| + | ==== File Type Filter ==== | ||
| + | In the '''Show''' menu, you can filter paths by extension: | ||
| + | * [[USD]] files (*.usd, *.usd, *.usd), | ||
| + | * Maya files (*.mb, *.ma), | ||
| + | * Other Files. | ||
| + | | style="vertical-align:top;"|<br> | ||
| + | [[File:wref_cm_menu_show.png]] | ||
|- | |- | ||
| − | |[[File: | + | | |
| + | ==== Content Update ==== | ||
| + | Using the '''Refresh''' button [[File:wref_cm_refresh.png]] you can refresh the '''Wref Context Manager''' window after the scene is reloaded. | ||
| + | The physical path to the file with the current context settings can be found in the '''Resolved''' column. <br> | ||
| + | By default, the column is hidden, you can show it as follows: '''context menu by table header => Show/Hide Resolved'''. | ||
| + | | style="vertical-align:top;"|<br> | ||
| + | [[File:wref_cm_header_context_menu.png]] | ||
|} | |} | ||
| − | |||
| − | |||
| − | + | == Working with the camera in USD scene == | |
| − | + | ||
| − | + | You can import a camera rig into a scene if you need to attach an object to the camera, freeze the camera movement, or hide the camera from the viewport.<br> | |
| − | + | ||
| + | '''1.''' Select '''AL USD Outliner''' from the '''Wizart Animation''' menu. | ||
{| | {| | ||
|- | |- | ||
| − | |[[ | + | | |
| + | [[Файл:Camera 0.png|обрамить|слева]] | ||
|} | |} | ||
| − | + | '''2.''' Select the camera and activate its rig. Now you can mute its movement, or constraints to it any object. | |
{| | {| | ||
|- | |- | ||
| − | |[[ | + | | |
| + | [[Файл:Camera rig.gif|обрамить|слева]] | ||
|} | |} | ||
| − | + | If you need to hide the camera in a scene, you can find it through the Outliner in Maya and hide it there using the Ctrl + H keys (use Shift + H to display the camera). | |
| − | |||
| − | |||
{| | {| | ||
|- | |- | ||
| − | |[[ | + | | |
| + | [[Файл:Camera hide.gif|обрамить|слева]] | ||
|} | |} | ||
Текущая версия на 20:56, 20 апреля 2020
So, you need to start working on an animation scene. The process of opening the scene is a little different from what you might have seen on other projects.
We use Pixar's USD format to store anim_prep (scene layout prepared for animators), so you won't be able to open the scene as usual.
Also a link to anim_prep scene is live, so when layout team add new assets to the anim_prep scene, they will also appear in your animation scene.
To do this, we use a plugin from Animal Logic, AL_USDmaya, with our inhouse modifications.
Содержание
How to build scene?
You only need to follow this procedure the first time you open a scene, after building and saving, you will be able to open the scene as usual.
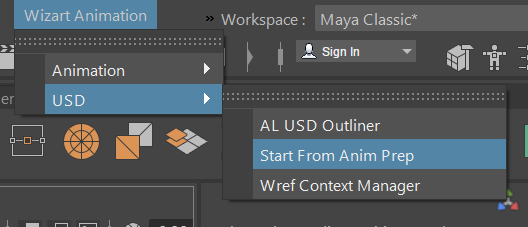
1. Always start building a new scene with empty scene, then select Wizart Animation => USD => Start From Anim Prep from the menu.
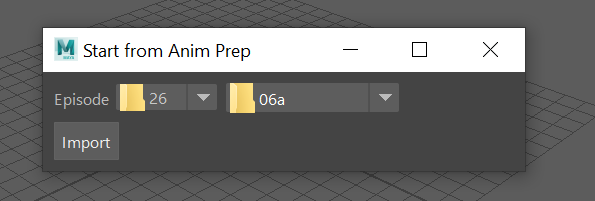
2. A dialog box will appear where you need to select the name of the Episode and the name of the Scene you want to start working on.
3. Then click Import.
After a successful Import, you can save the scene to your working folder, and then you can open and save the scene as usual.
As a result of Import operation will be created:
- A Proxy Shape object AL_USDmaya will be created with a link to the latest version of the USD scene via wref.
- The Frame Range from the USD scene.
- A link to the latest version of the sound will be created as a may reference via wref.
- Will automatically be put down in the scene pin on the Wref Context of all Maya's rigs. This means that you will need to switch the rig versions explicitly through The Wref Context Manager,
if needed. All other files referenced in scene we don't pin, so latest available versions will be loaded.
| In any case, do not manually correct the path to the files, it can break the entire pipeline. If you have a problem with the scene, please email support. |
Working with the USD scene
The entire scene is loaded as a USD Proxy, and a minimum number of maya nodes are created.
Characters have no rig loaded at the start, but they should be displayed in the starting position.
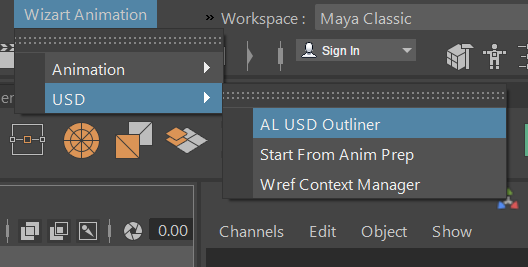
To see the real hierarchy of the scene, you need to open USD Outliner.
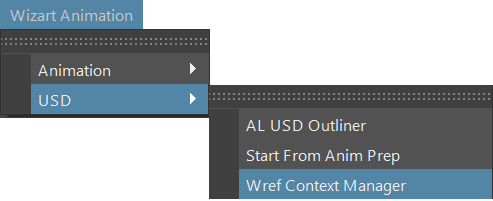
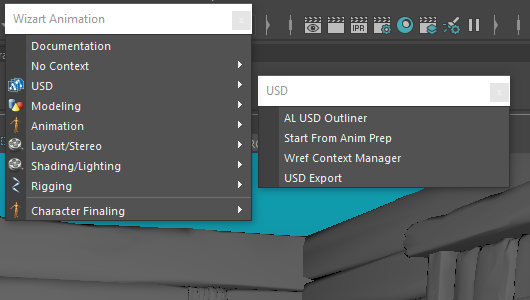
To do this, select Wizart Animation => USD => AL USD Outliner.
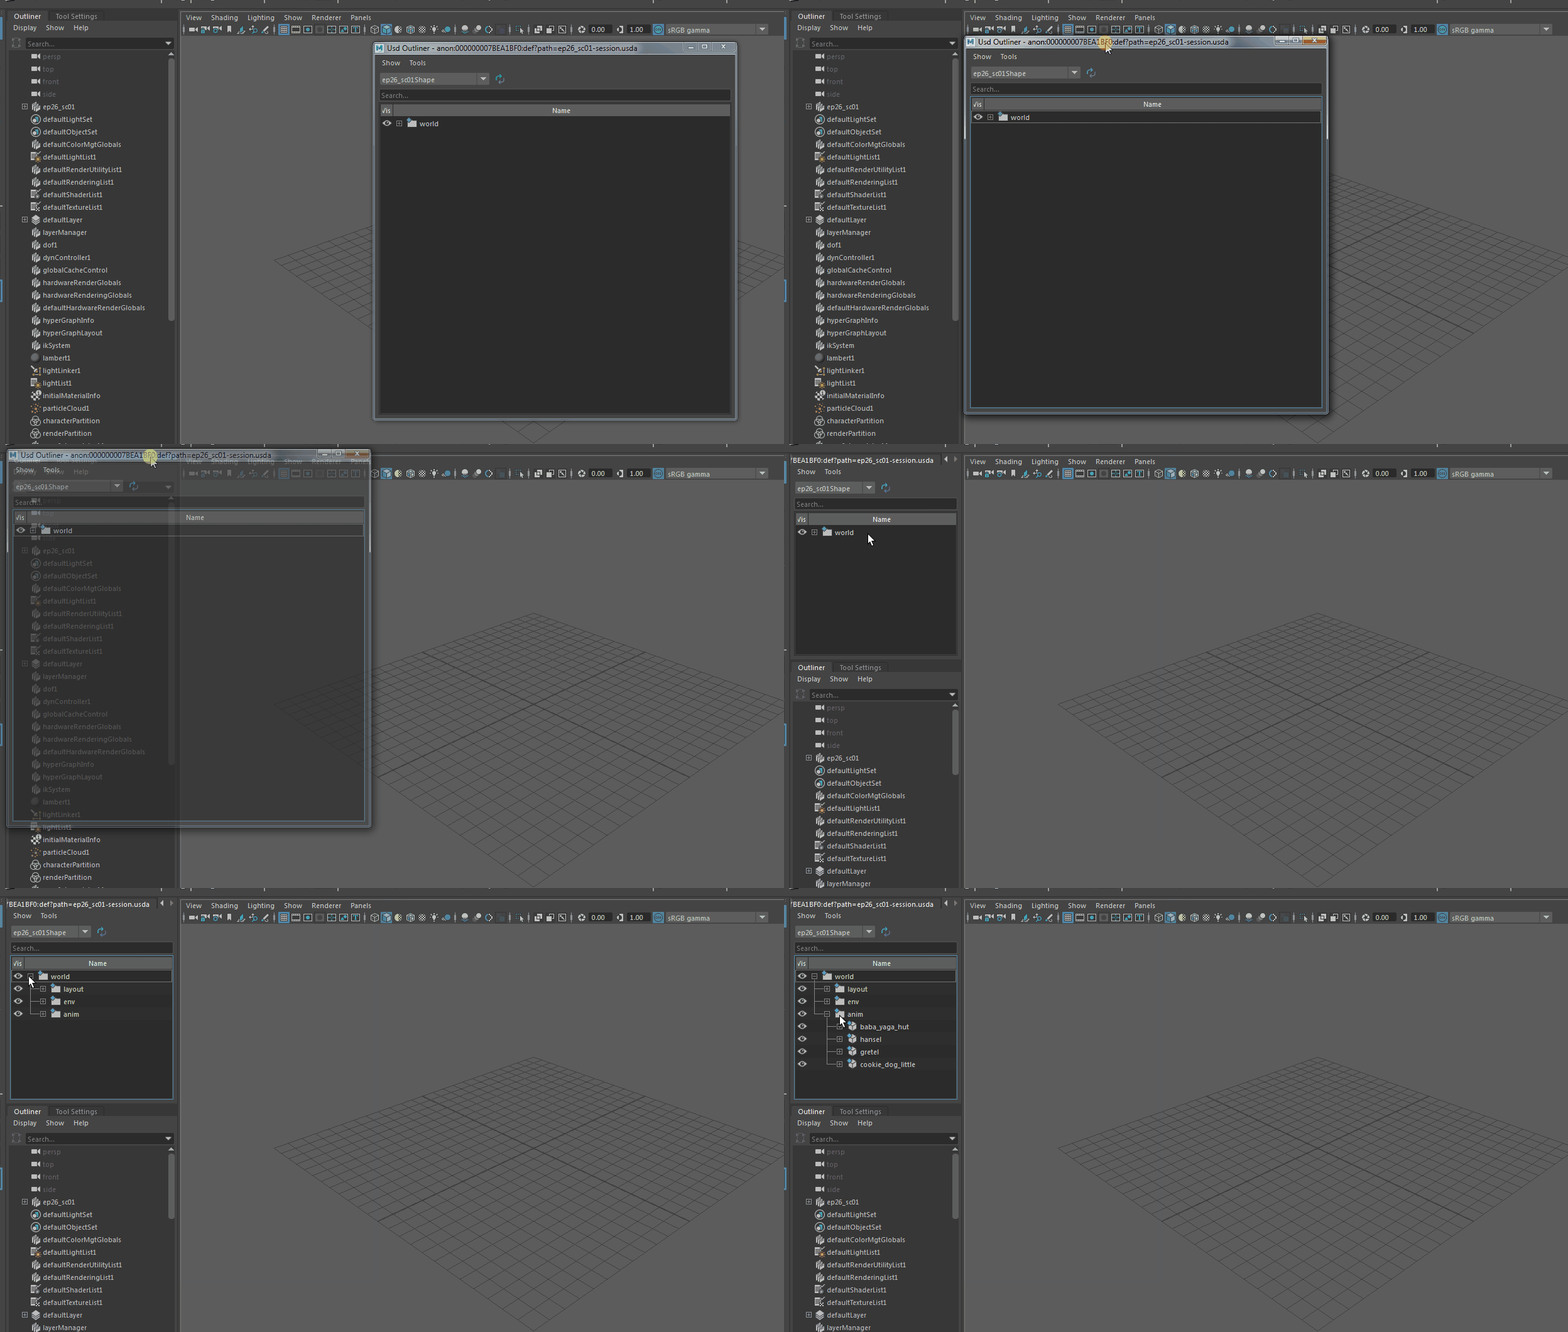
The created panel can be docked to Maya's UI.
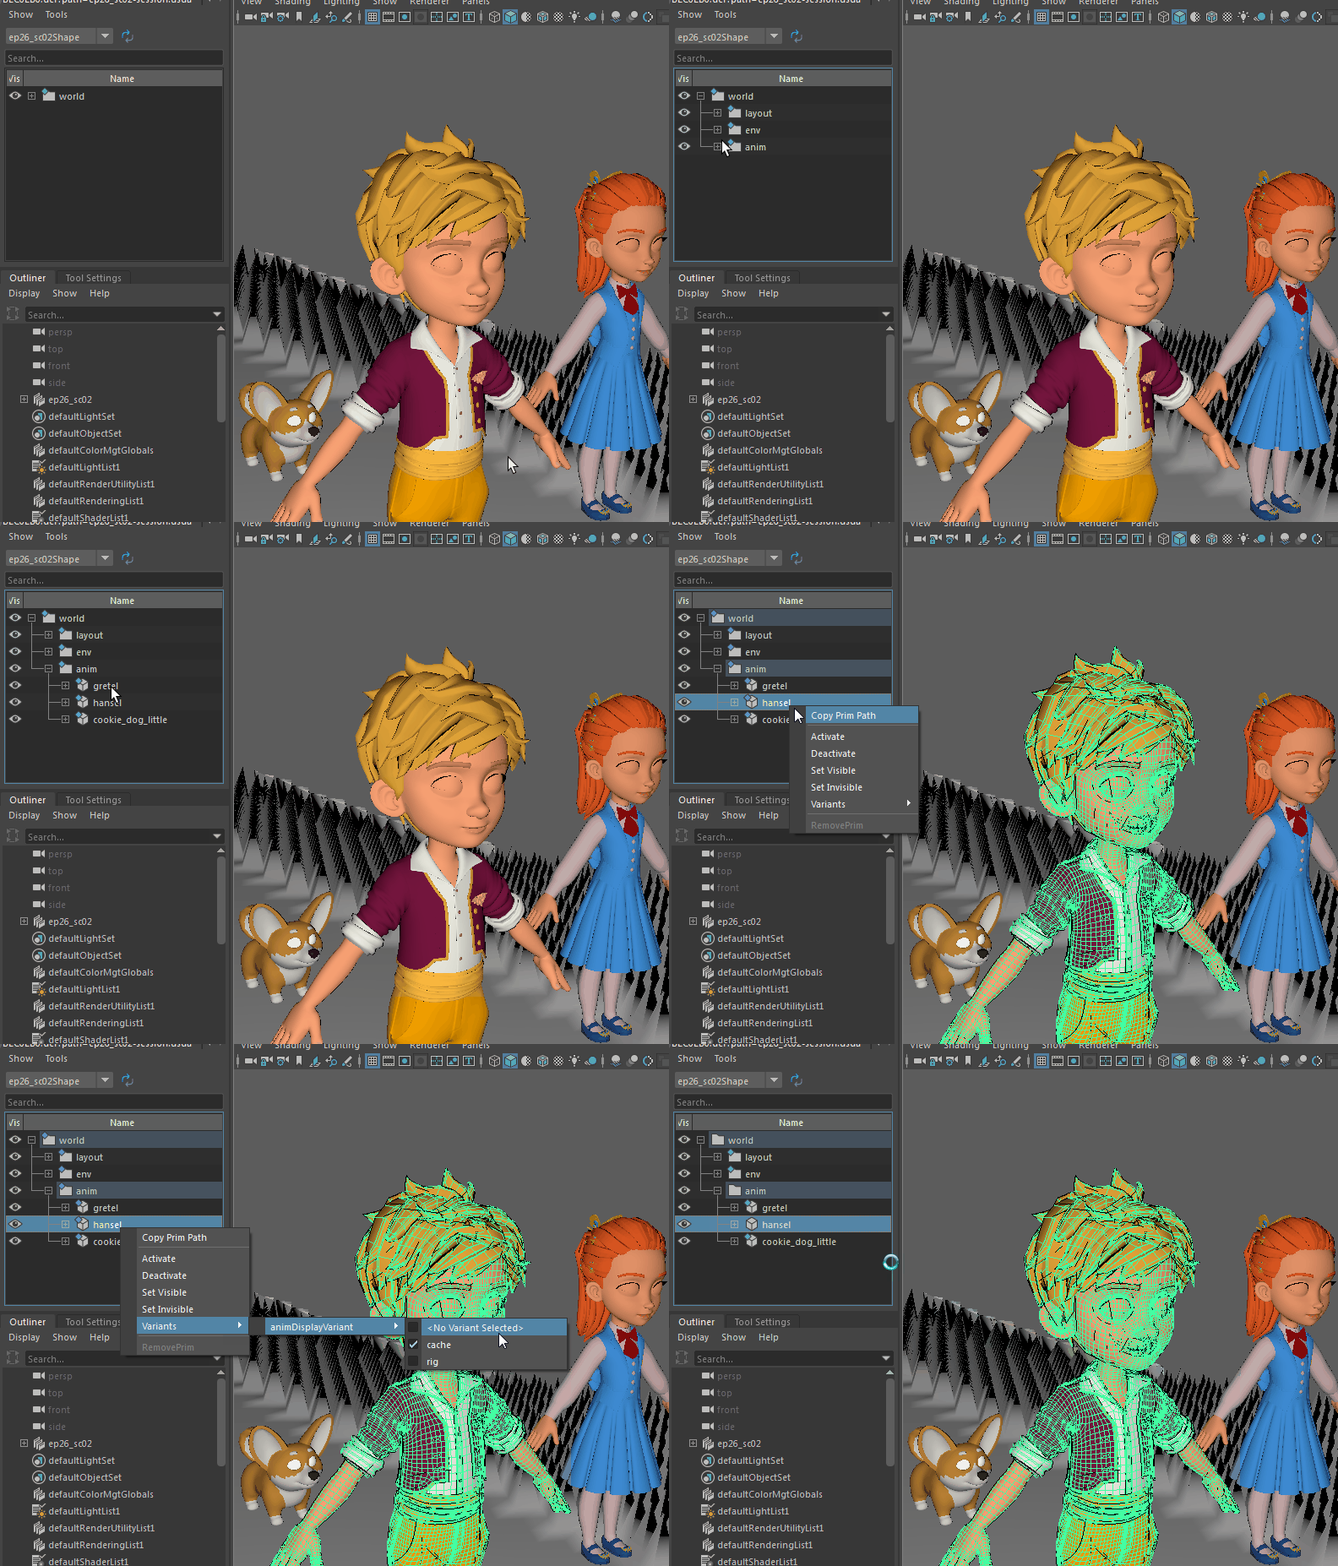
In the beginning, you need to decide on which characters or items you need to load rig.
It may not be all assets, for example, the assetin this scene is static, or the supervisor animator has given you the task to animate only certain assets.
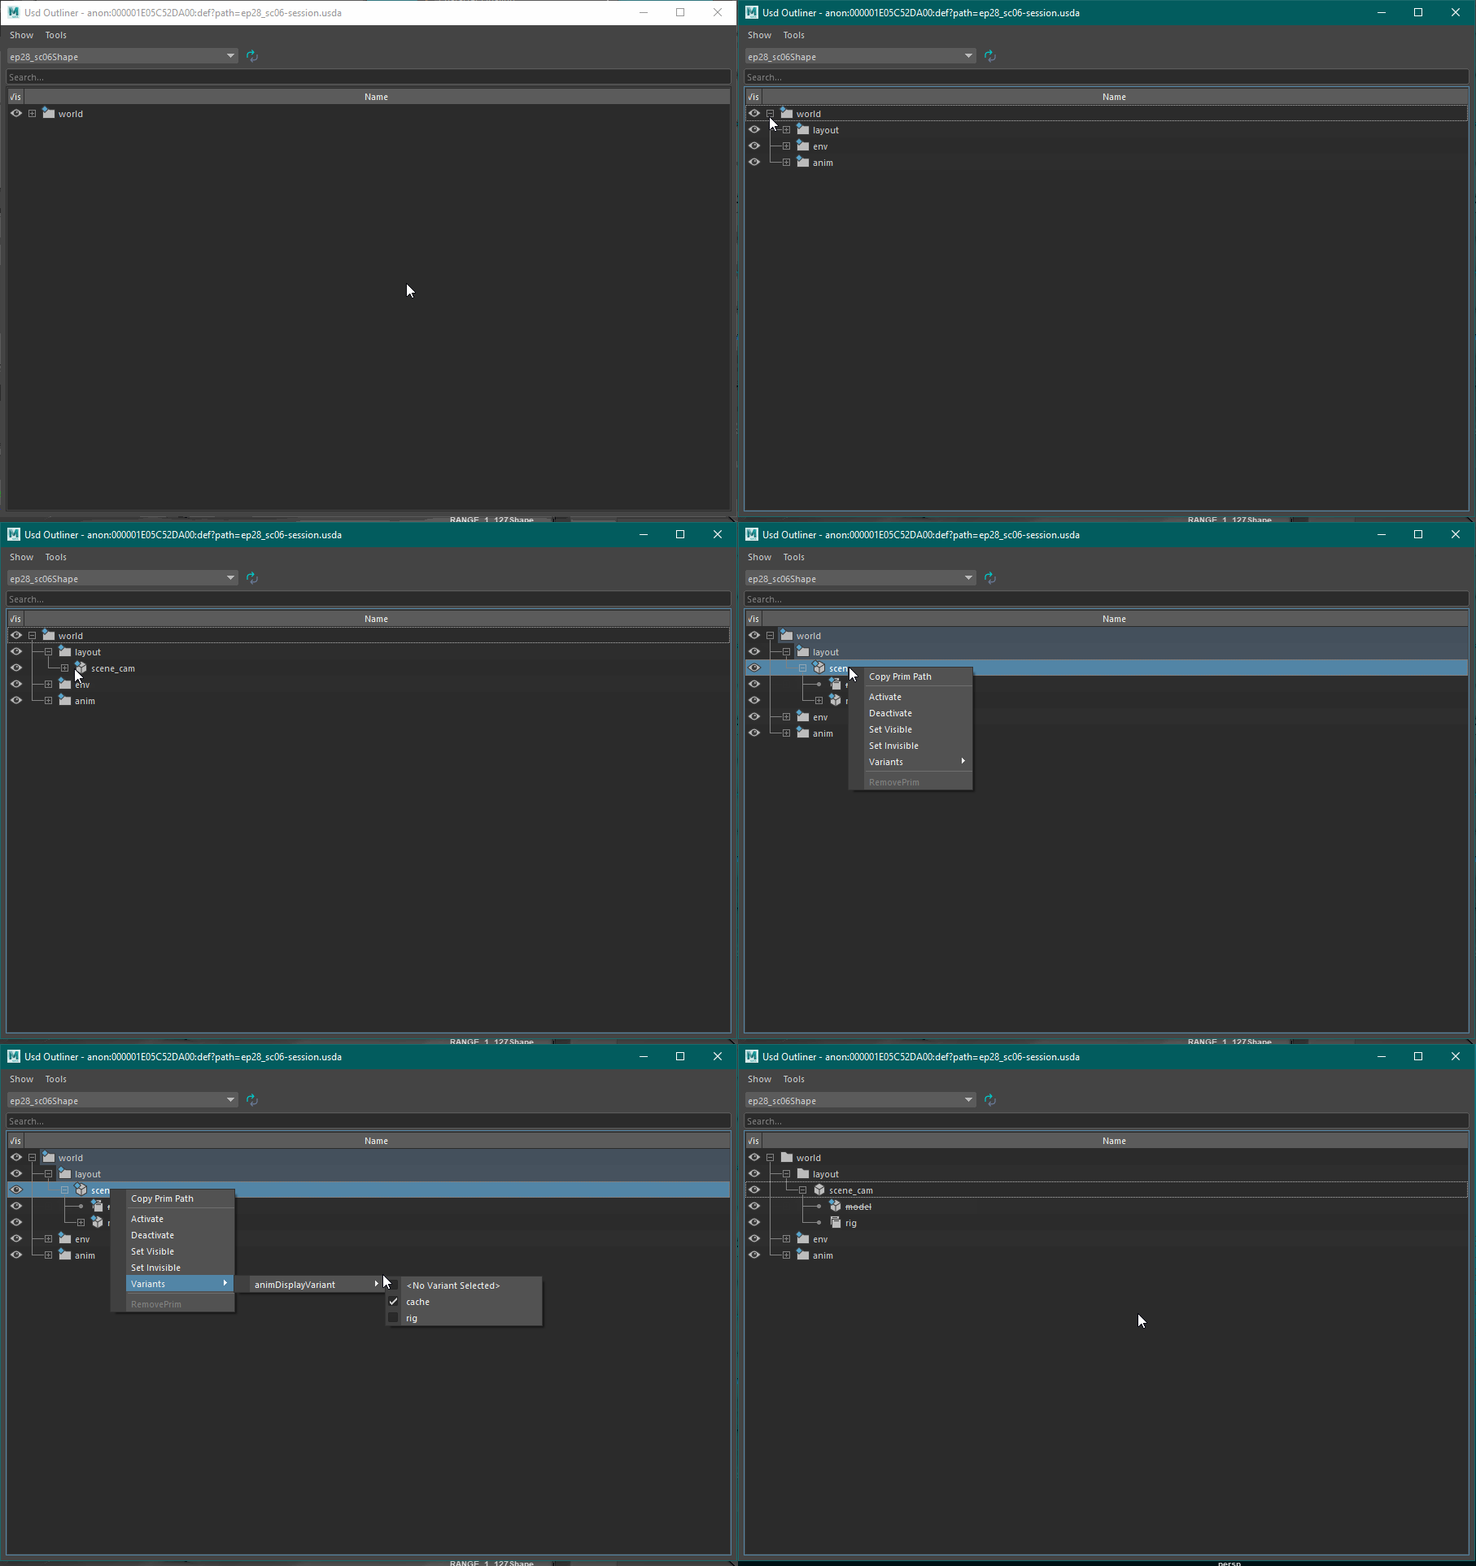
To switch the asset from cache to rig, select the asset in USD Outliner, and right-click in the context menu Variants=>animDisplayVariant=>rig.
This will download the maya reference onto the asset, and it will have to move to the same location as it was set in the USD scene.
| Asset references are now managed by the AL_USDmaya plugin, and the Department that prepares anim_prep. If your scene is missing an asset, contact support. |
| Since this plugin controls the creation and on/off of references, in no case can you use the Reference Editor and edit references manually. This can lead to crashes. |
Activate & Deactivate
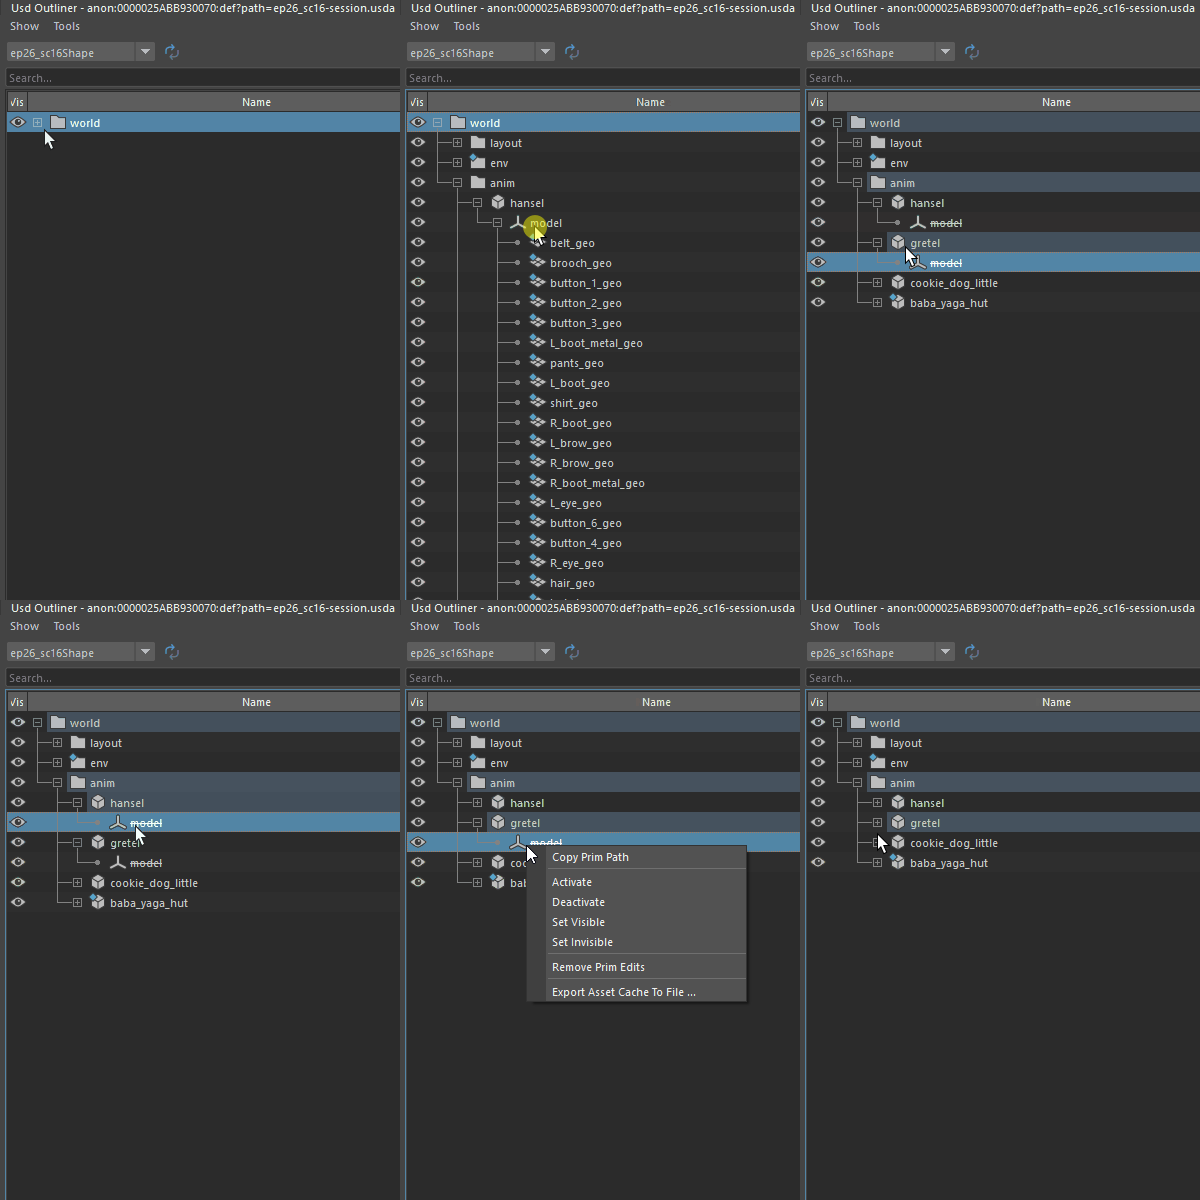
When creating animations, manipulations are made with just a few objects. Most of the scene may be idle at this stage. Processing all scene objects may slow performance. To solve this problem, USD prims have an attribute Active. Prims are active by default, which means they and their active children will be composed and visited by stage traversals. By making a prim inactive, we prevent the prim itself from being visited by default traversals, and we also prevent the prim's descendant prims from even being composed on the stage. USD Outliner has two commands for working with the Active attribute: Activate and Deactivate. The Deactivate command changes the value of the Active attribute, making the prim inactive. Thus, the prim, as well as their children that may be contained in it, will be filtered out during processing. The name of the inactive prim will be
|
Working with Wref Context Manager
All paths in the scene, including USD Layers, Maya references, texture paths have a wref format.
Such paths usually doesn't include reference to a specific version of the asset and normally you do not need to change this in the process.
However, animator's work may require to define version explicitly:
- For example, when you start working on a scene, you want to pin the rig versions for a current scene, so that you can take a newer version while working on another scene.
- You have found some technical issue in the rig, and want to update version of the rig to a newer one in the scene explicitly and locally not breaking anything else.
|
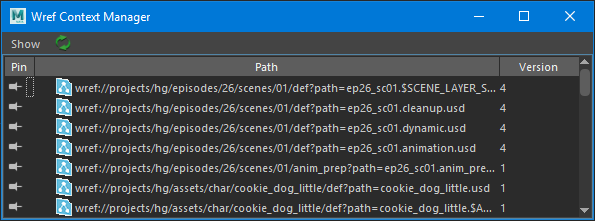
For this purpose we store a special wref context in the Maya scene applied both in Maya and in USD. This wref context update the wref path to a physical path on disk. |
|||
Pin |
|||
| |||
|
|||
Update to the latest version / Unpin
|
| ||
| |||
Update to lates and Pin
|
| ||
Data Output SettingsFile Type FilterIn the Show menu, you can filter paths by extension:
|
|||
Content UpdateUsing the Refresh button |
|||
Working with the camera in USD scene
You can import a camera rig into a scene if you need to attach an object to the camera, freeze the camera movement, or hide the camera from the viewport.
1. Select AL USD Outliner from the Wizart Animation menu.
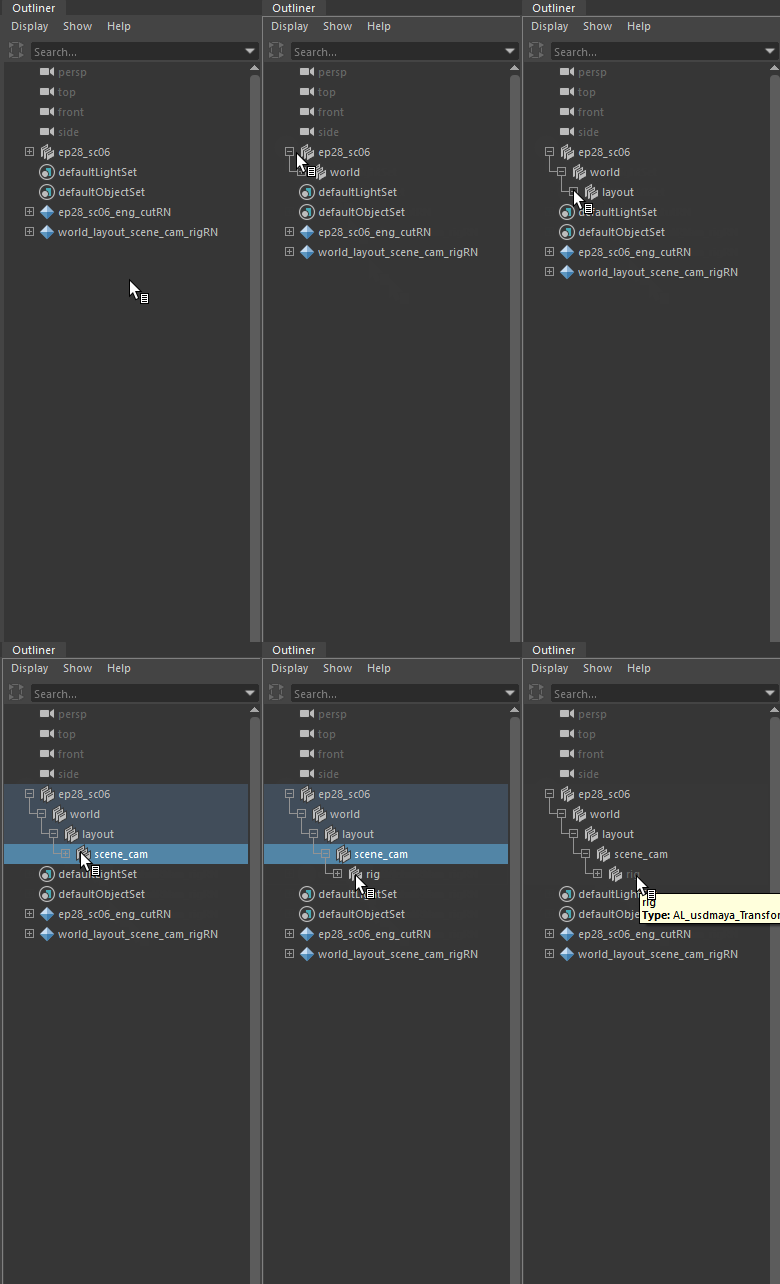
2. Select the camera and activate its rig. Now you can mute its movement, or constraints to it any object.
If you need to hide the camera in a scene, you can find it through the Outliner in Maya and hide it there using the Ctrl + H keys (use Shift + H to display the camera).
