Getting started on a shot/en — различия между версиями
(Новая страница: «'''2.''' When you have icons with project names, you can double-click on the icon to go to the project. <br> Wizart Desktop will remember the project you selected…») |
(Новая страница: «<br> 🔙 back») |
||
| (не показана 31 промежуточная версия этого же участника) | |||
| Строка 23: | Строка 23: | ||
|} | |} | ||
| − | '''3.''' | + | '''3.''' In the Apps tab that appears, there will be an icon '''Maya''', initially it is gray and inactive. |
{| | {| | ||
|- | |- | ||
| Строка 29: | Строка 29: | ||
|} | |} | ||
| − | + | You need to tell Wizart Desktop where is '''Maya''' installed on your PC. <br> | |
| − | + | There are two ways of doing that: <br> | |
| − | * | + | * Click Right Mouse Button on '''Maya''' icon and in context menu select '''Scan for Software''', and Wizart Desktop will try to find Maya at default installation path. It could fail on your configuration. In that case, use the way below. |
| − | |||
| − | |||
{| | {| | ||
|- | |- | ||
| Строка 39: | Строка 37: | ||
|} | |} | ||
| − | * | + | * Click Right Mouse Button on '''Maya''' icon and in context menu select '''Scan Software Executable Path''', and use the showed dialog windows to specify location for '''maya.exe''' file. |
{| | {| | ||
|- | |- | ||
| Строка 45: | Строка 43: | ||
|} | |} | ||
| − | '''4.''' | + | '''4.''' When you find '''Maya''' location in any of ways above, icon will be colored and you can now start '''Maya''' using double click. |
{| | {| | ||
|- | |- | ||
| Строка 52: | Строка 50: | ||
| − | '''5.''' | + | '''5.''' Now you can start working in '''Maya'''. |
| − | {{warning| | + | {{warning| Important| Note that it is ALWAYS necessary to run '''Maya''' through '''Wizart Desktop''' in order for it to set up the correct environment for loading resources.}}<br> |
{| | {| | ||
|- | |- | ||
| Строка 62: | Строка 60: | ||
{| | {| | ||
|- | |- | ||
| − | === | + | === Quick Launch Setup === |
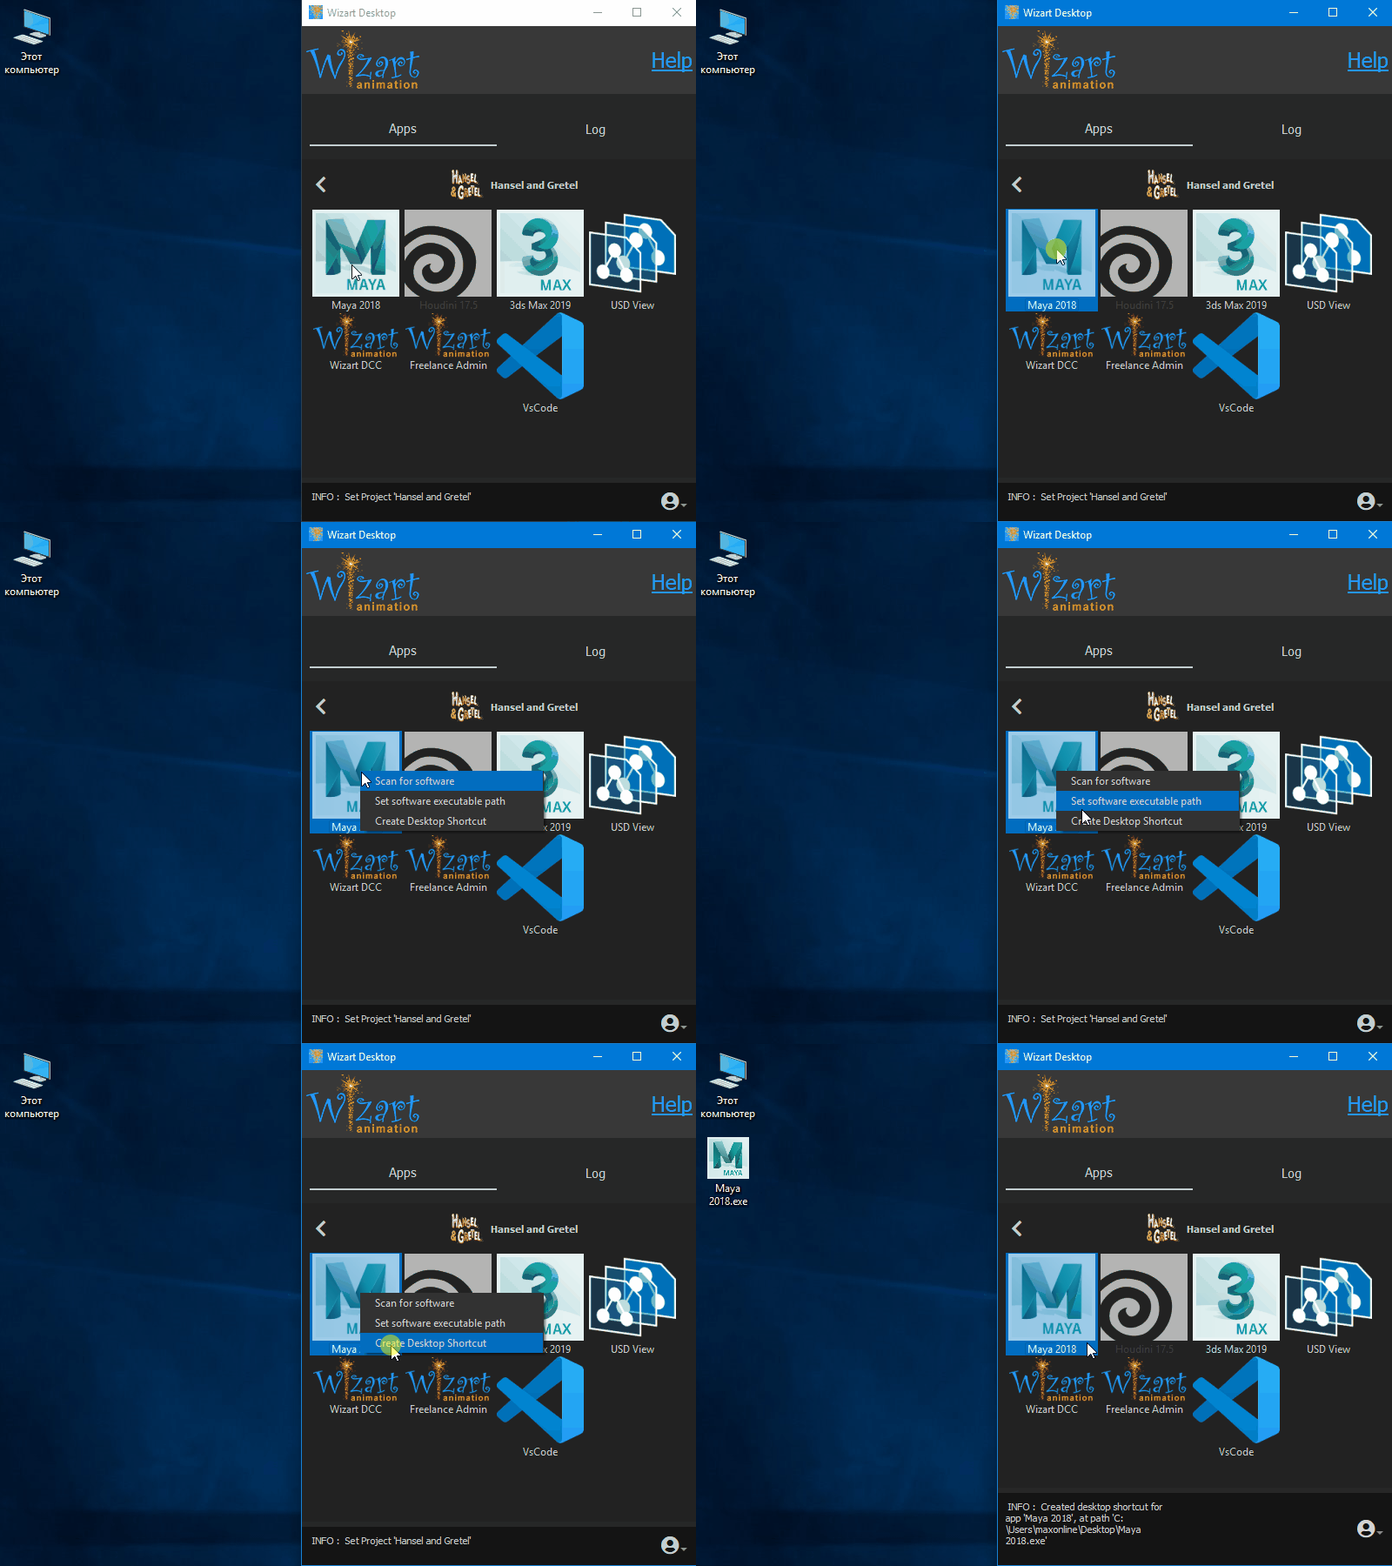
| − | + | You can launch the application with the necessary plug-ins in the usual way from a convenient place without opening Wizart Desktop every time:<br> | |
| − | * | + | |- |
| + | | | ||
| + | * Right-click on the application icon and select '''Create Desktop Shortcut'''.<br>An application launch file will be created on the desktop. | ||
{| | {| | ||
|- | |- | ||
| Строка 70: | Строка 70: | ||
|} | |} | ||
| − | * | + | * Another way to create a launcher is to drag the icon of the desired program onto the desktop by holding down the '''Shift''' key. |
{| | {| | ||
|- | |- | ||
| Строка 76: | Строка 76: | ||
|} | |} | ||
| − | == | + | == Build the scene == |
| − | + | So, you need to start working on an animated scene. The process of opening the scene is a little different from what you might have seen on other projects. <br> | |
| − | + | We use Pixar's [[USD]] format to store the scene layout prepared for animators, so you won't be able to open the scene as usual. <br> | |
| − | {{warning| | + | {{warning| Important| You must follow this procedure only when you first open the scene, after building and saving, you will be able to open the scene as usual.}} |
| − | '''1.''' ''' | + | '''1.''' '''Always''' start building a new scene with '''empty scene''', then select '''Wizart Animation => USD => Start From Anim Prep''' from the menu. |
{| | {| | ||
|- | |- | ||
| Строка 88: | Строка 88: | ||
|} | |} | ||
| − | '''2.''' | + | '''2.''' A dialog box will appear where you need to select the name of the Episode and the name of the Scene you want to start working on. |
{| | {| | ||
|- | |- | ||
| Строка 94: | Строка 94: | ||
|} | |} | ||
| − | '''3.''' | + | '''3.''' Then click '''Import'''. <br> |
| − | <big> | + | <big> After a successful '''Import''', you can save the scene to your working folder, and then you can open and save the scene as usual. </big> |
| − | <small> | + | <small> |
| − | * | + | As a result of Import operation will be created: |
| − | * | + | * A Proxy Shape object [[AL_USDmaya]] will be created with a link to the latest version of the [[USD]] scene via [[Wref Resolver| wref]]. |
| − | * | + | * The Frame Range from the [[USD]] scene. |
| − | * | + | * A link to the latest version of the sound will be created as a may reference via [[Wref Resolver| wref]]. |
| − | + | * Will automatically be put down in the scene pin on the Wref Context of all Maya's rigs. This means that you will need to switch the rig versions explicitly through The Wref Context Manager, <br> if needed. All other files referenced in scene we don't pin, so latest available versions will be loaded. | |
| + | </small> | ||
| − | {{warning| | + | {{warning| Warning| In any case, do not manually correct the path to the files, it can break the entire pipeline. If you have a problem with the scene, please email support.}}<br> |
| − | == | + | == Working with the USD scene == |
| − | + | The entire scene is loaded as a USD Proxy, and a minimum number of maya nodes are created. <br> | |
| − | + | <big>Characters have no rig loaded at the start, but they should be displayed in the starting position.</big> <br> | |
| − | + | To see the real hierarchy of the scene, you need to open USD Outliner. | |
| − | + | To do this, select '''Wizart Animation => USD => AL USD Outliner'''. | |
{| | {| | ||
|- | |- | ||
| Строка 116: | Строка 117: | ||
|} | |} | ||
| − | + | The created panel can be docked to Maya's UI. | |
{| | {| | ||
| Строка 123: | Строка 124: | ||
|} | |} | ||
| − | + | In the beginning, you need to decide on which characters or items you need to load rig. <br> | |
| − | + | It may not be all assets, for example, the assetin this scene is static, or the supervisor animator has given you the task to animate only certain assets.<br> | |
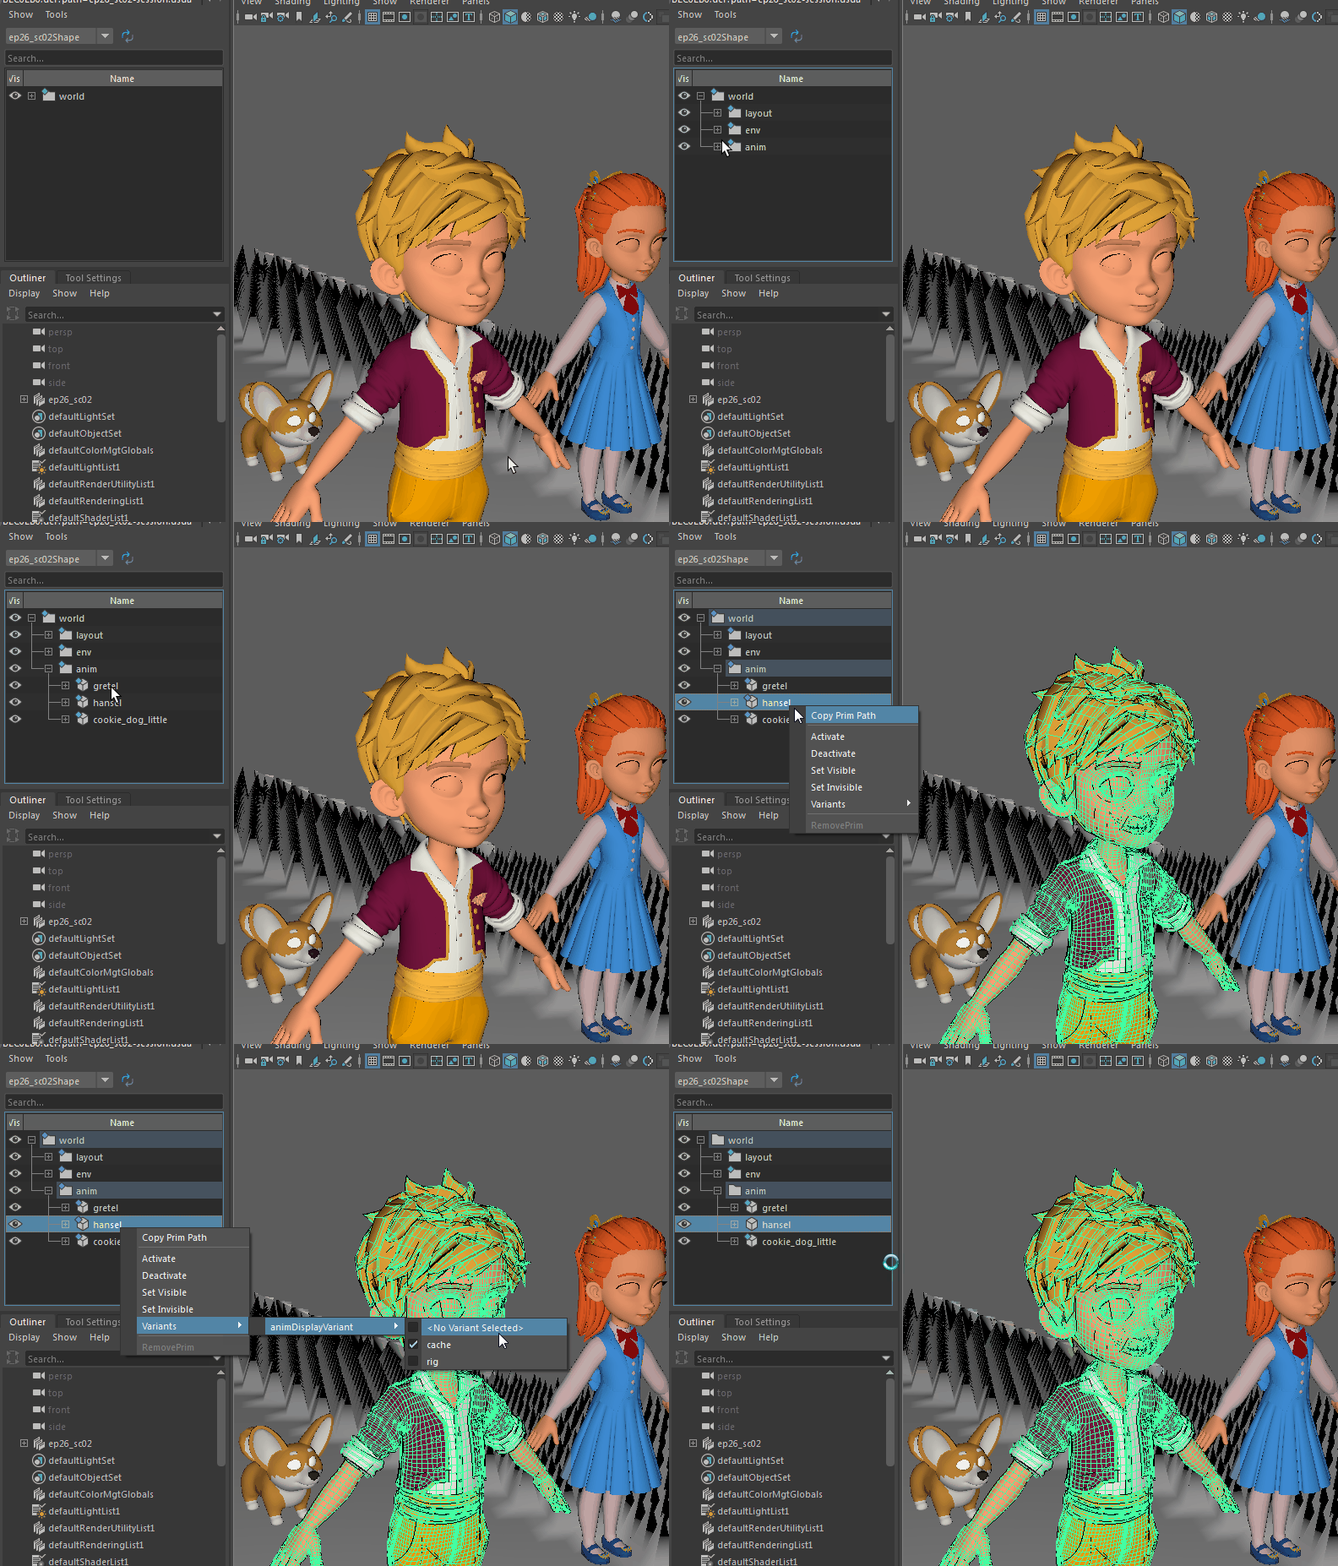
| − | + | To switch the asset from cache to rig, select the asset in '''USD Outliner''', and right-click in the context menu '''Variants=>animDisplayVariant=>rig'''. <br> | |
| − | + | This will download the maya reference onto the asset, and it will have to move to the same location as it was set in the Layout. | |
{| | {| | ||
|- | |- | ||
| Строка 132: | Строка 133: | ||
|} | |} | ||
| − | {{warning| | + | {{warning| Important| Since the USD plugin controls the creation and switching on/off of references, you should never use the '''Reference Editor''' and edit references manually. This can lead to crashes.}}<br> |
| + | |||
{| class="graytable" border="0" style="width:100%;" | {| class="graytable" border="0" style="width:100%;" | ||
| Строка 138: | Строка 140: | ||
| style="width:50%;vertical-align:top;" | | | style="width:50%;vertical-align:top;" | | ||
| − | === | + | === Activate & Deactivate === |
<br> | <br> | ||
| − | + | When creating animations, manipulations are made with just a few objects. Most of the scene may be idle at this stage. Processing all scene objects may slow performance.<br> | |
| − | |||
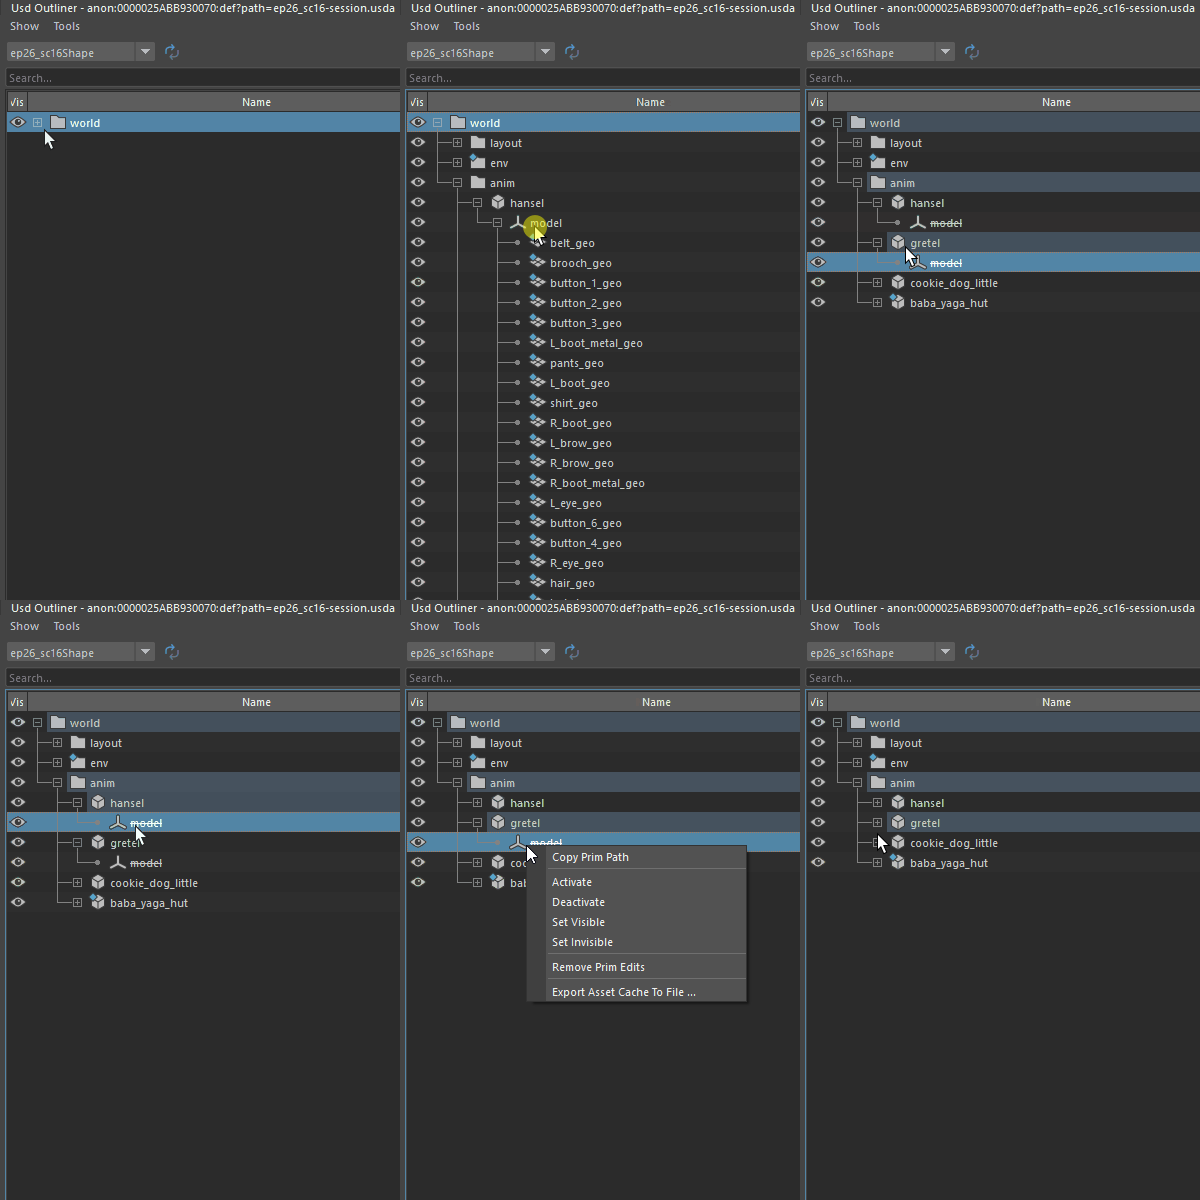
| − | + | To solve this problem, [[USD|'''USD''']] <abbr title='A Prim is the primary container object in USD: prims can contain (and order) other prims, creating a "namespace hierarchy" on a Stage, and prims can also contain (and order) properties that hold meaningful data'>'''prims'''</abbr> have an attribute '''Active'''. '''Prims''' are active by default, which means they and their active children will be composed and visited by stage traversals. By making a prim inactive, we prevent the '''prim''' itself from being visited by default traversals, and we also prevent the prim's descendant prims from even being composed on the stage.<br> | |
| − | + | '''USD Outliner''' has two commands for working with the Active attribute: '''Activate''' and '''Deactivate'''.<br> | |
| − | + | The '''Deactivate''' command changes the value of the '''Active''' attribute, making the '''prim''' inactive. Thus, the '''prim''', as well as their children that may be contained in it, will be filtered out during processing.<br> | |
| − | + | The name of the inactive '''prim''' will be <s>strike out</s>. All children of this '''prim''' will also be inactive and will be excluded from the list.<br> | |
| − | + | The '''Activate''' command makes '''prim''' and his children active again, if necessary.<br> | |
|[[Файл:ActivateDeactivate.gif|centre]] | |[[Файл:ActivateDeactivate.gif|centre]] | ||
| Строка 158: | Строка 159: | ||
<br> | <br> | ||
| − | [[Project_RL|🔙 | + | [[Project_RL/en|🔙 back]] |
Текущая версия на 15:01, 29 апреля 2021
Содержание
Selecting a project and running the program
Along with the project resources, you should download the software configuration files. Usually they are on the way:
{your_folder}/projects/<project_code>/.config
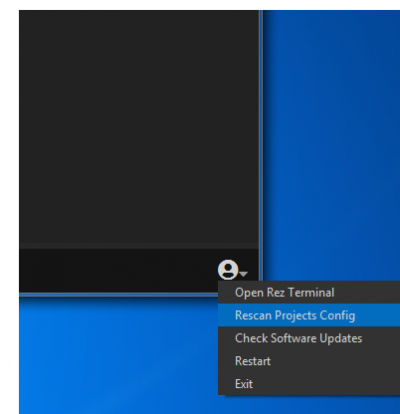
1. If you have downloaded the files and no available projects appear on the Apps tab, select the Rescan Projects Config option.
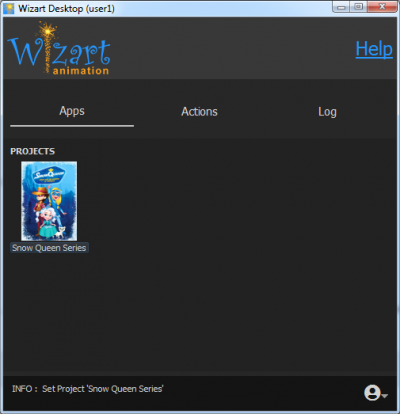
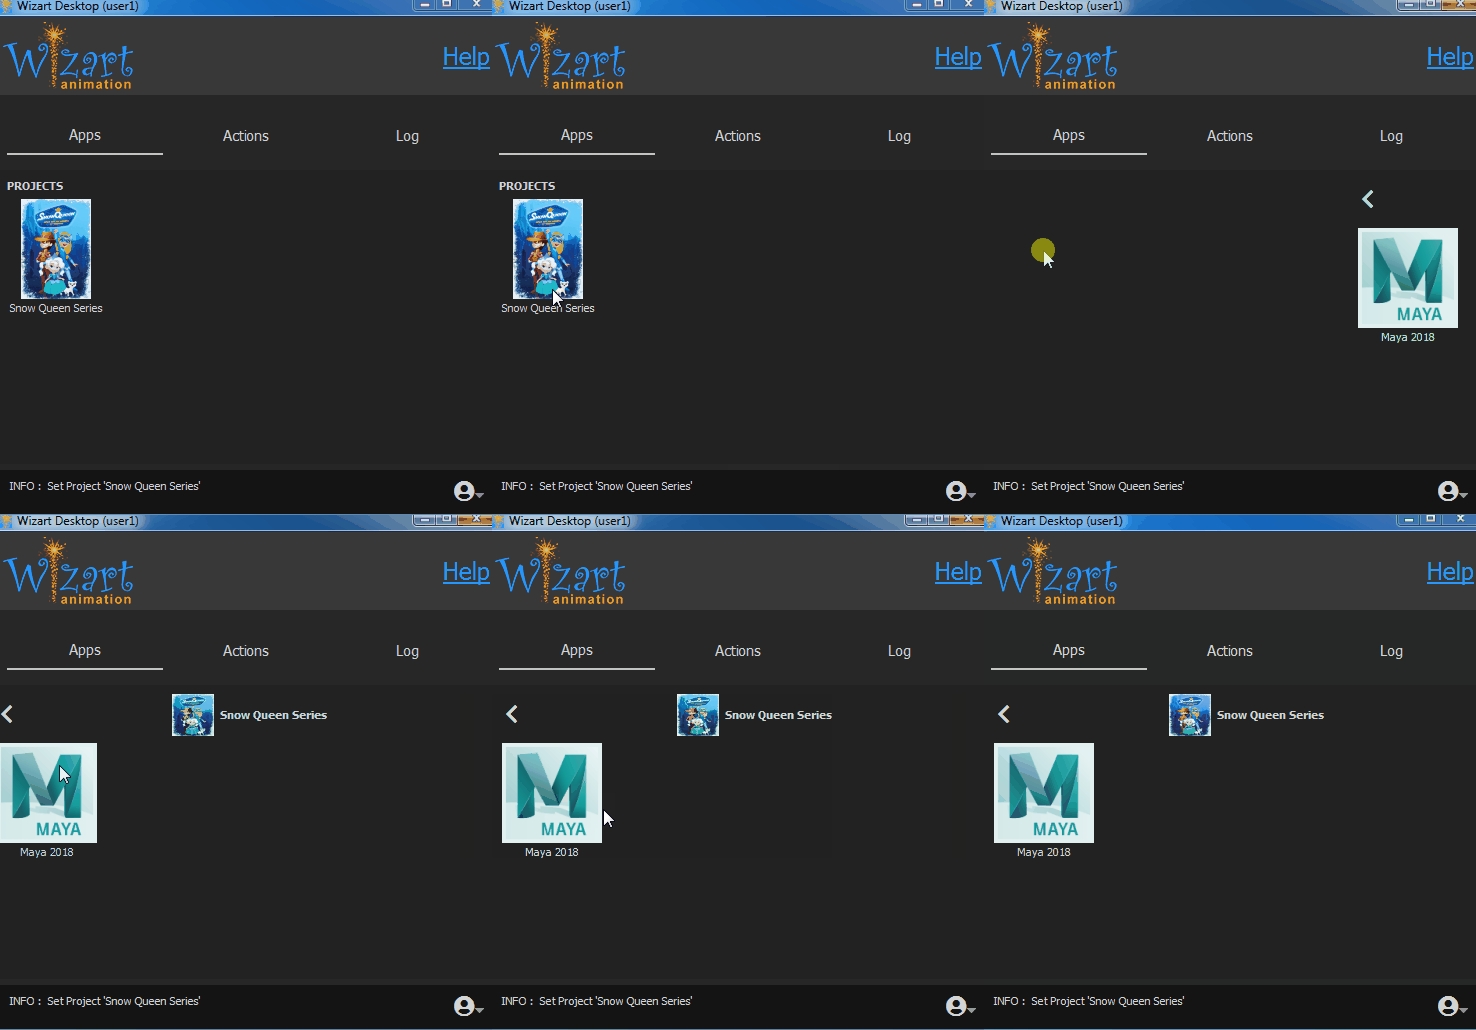
2. When you have icons with project names, you can double-click on the icon to go to the project.
Wizart Desktop will remember the project you selected for the next launch. Next, you will see a list of programs available to you.
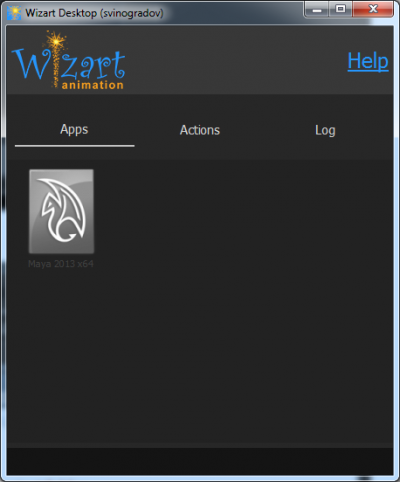
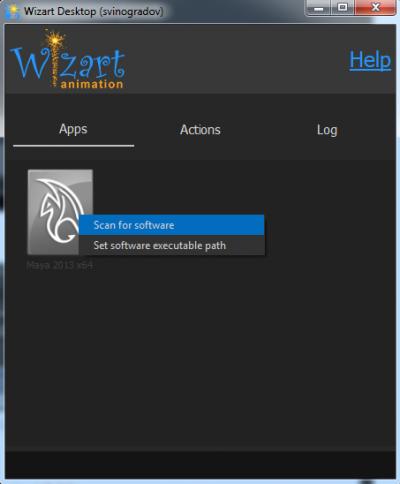
3. In the Apps tab that appears, there will be an icon Maya, initially it is gray and inactive.
You need to tell Wizart Desktop where is Maya installed on your PC.
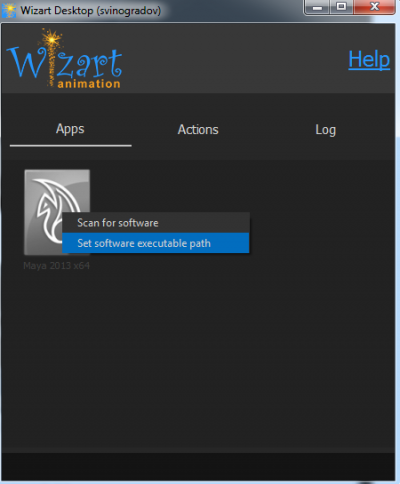
There are two ways of doing that:
- Click Right Mouse Button on Maya icon and in context menu select Scan for Software, and Wizart Desktop will try to find Maya at default installation path. It could fail on your configuration. In that case, use the way below.
- Click Right Mouse Button on Maya icon and in context menu select Scan Software Executable Path, and use the showed dialog windows to specify location for maya.exe file.
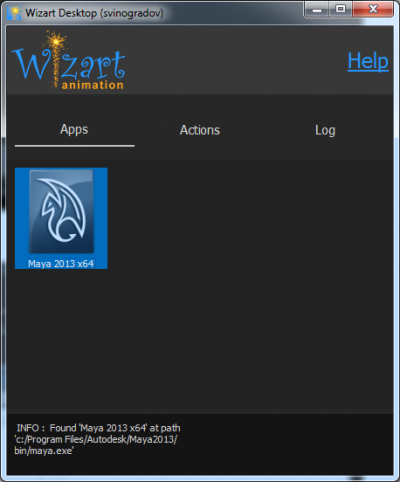
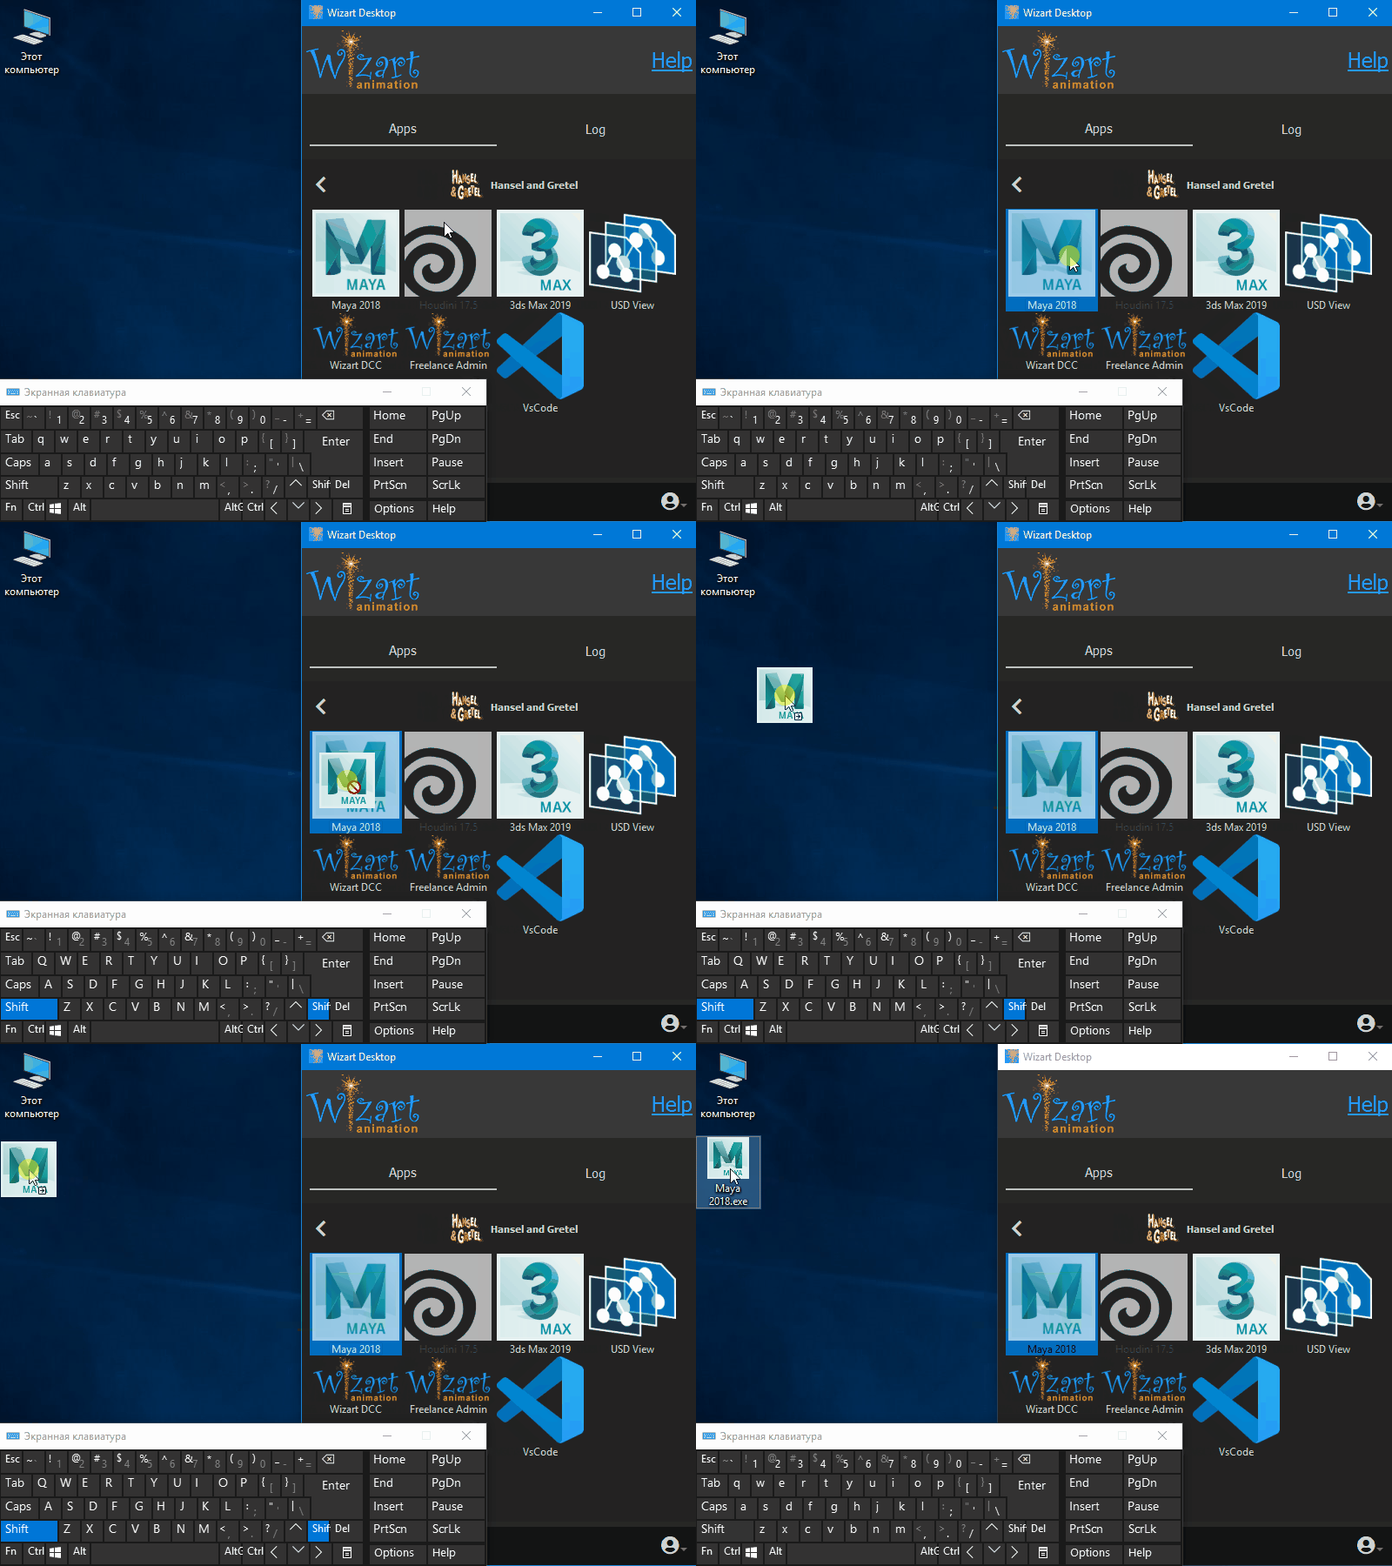
4. When you find Maya location in any of ways above, icon will be colored and you can now start Maya using double click.
5. Now you can start working in Maya.
| Note that it is ALWAYS necessary to run Maya through Wizart Desktop in order for it to set up the correct environment for loading resources. |
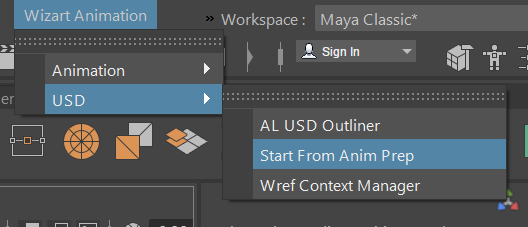
Build the sceneSo, you need to start working on an animated scene. The process of opening the scene is a little different from what you might have seen on other projects.
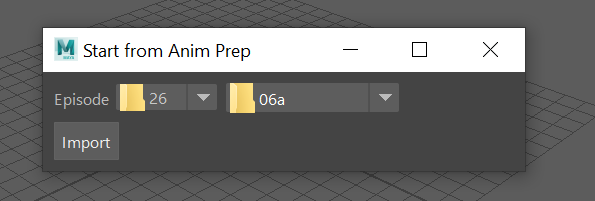
2. A dialog box will appear where you need to select the name of the Episode and the name of the Scene you want to start working on. 3. Then click Import. As a result of Import operation will be created:
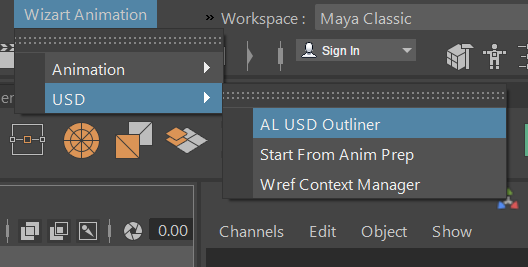
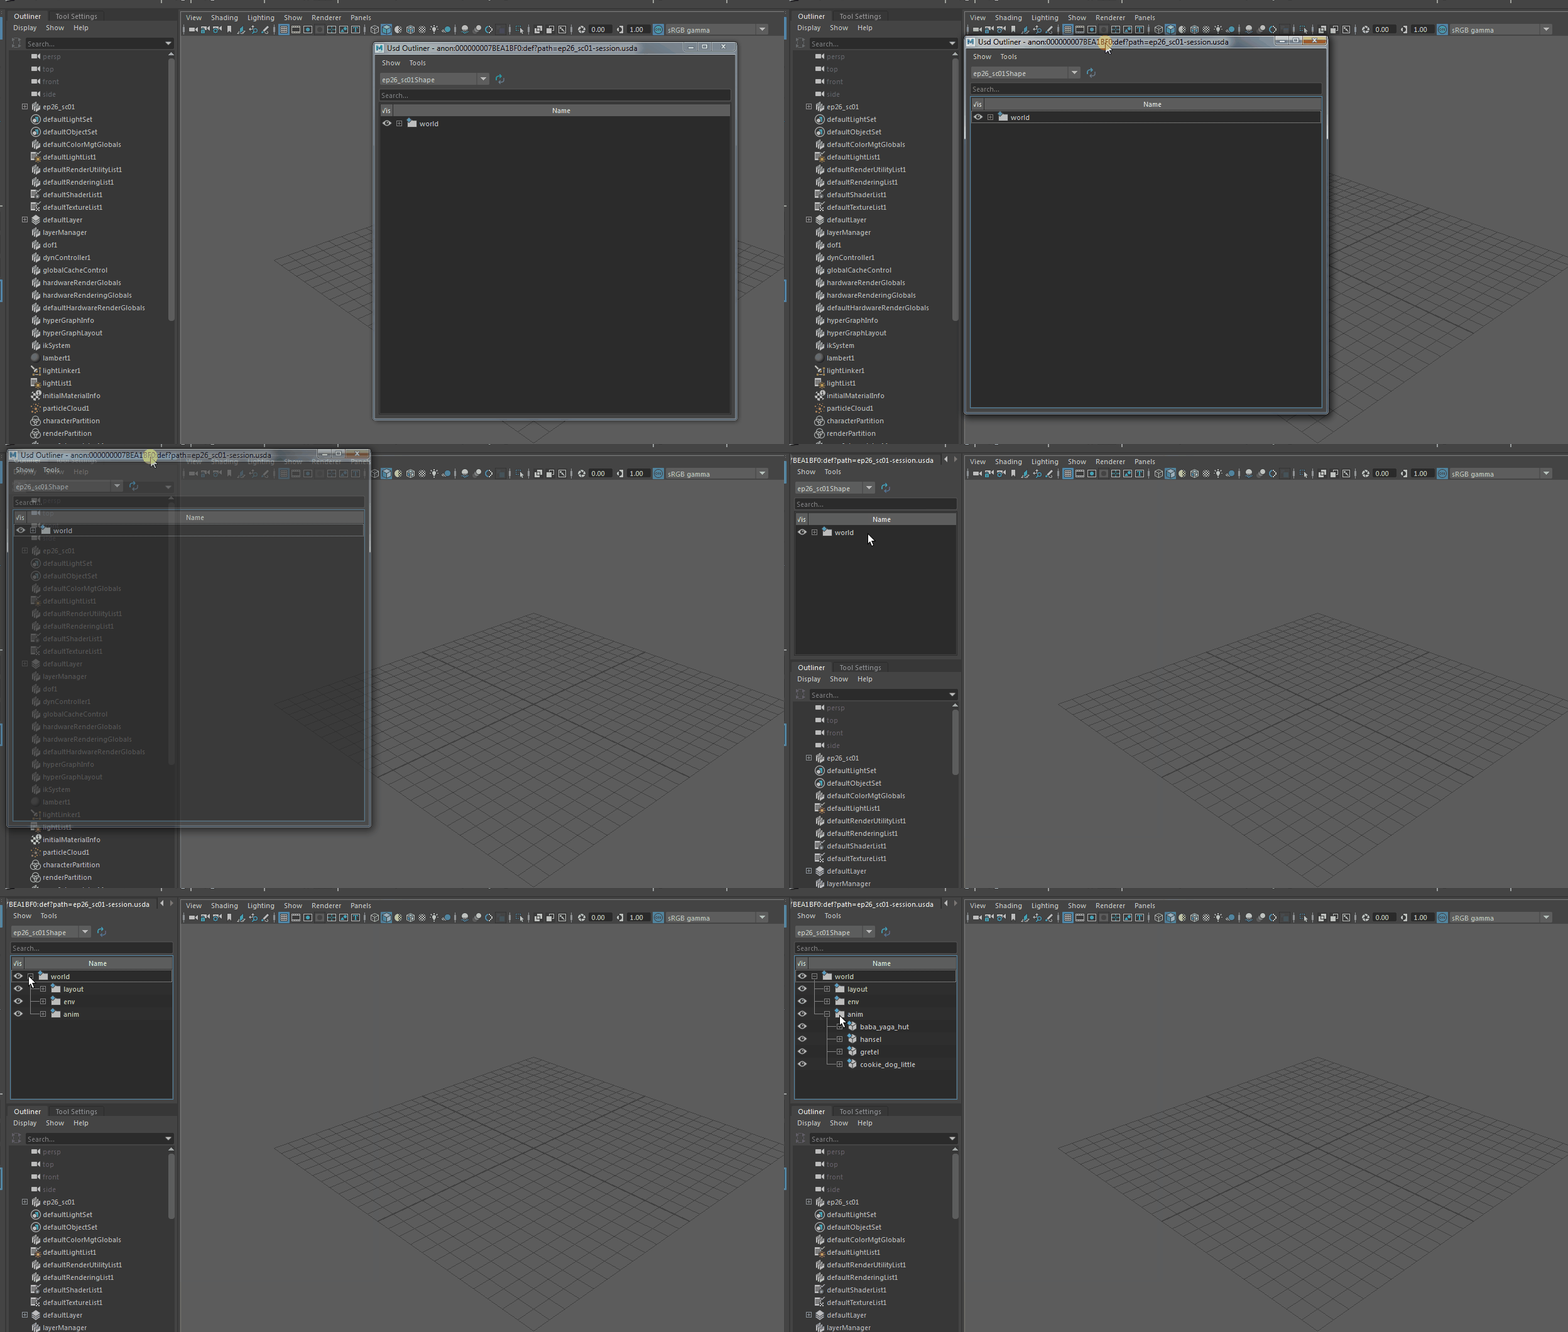
Working with the USD sceneThe entire scene is loaded as a USD Proxy, and a minimum number of maya nodes are created. The created panel can be docked to Maya's UI. In the beginning, you need to decide on which characters or items you need to load rig.
|
